89 Navigation & Internal Links
Textbooks, scholarly monographs and other academic documents are often unique in their large size and their intended use, which is rarely to be read in a linear fashion. Both of these traits mean that readers need clear and easy ways to navigate. This chapter will cover:
- How to create internal links
- How to create custom internal links using anchor tags
- How to manage slugs
- Naming conventions
How to Create Internal Links
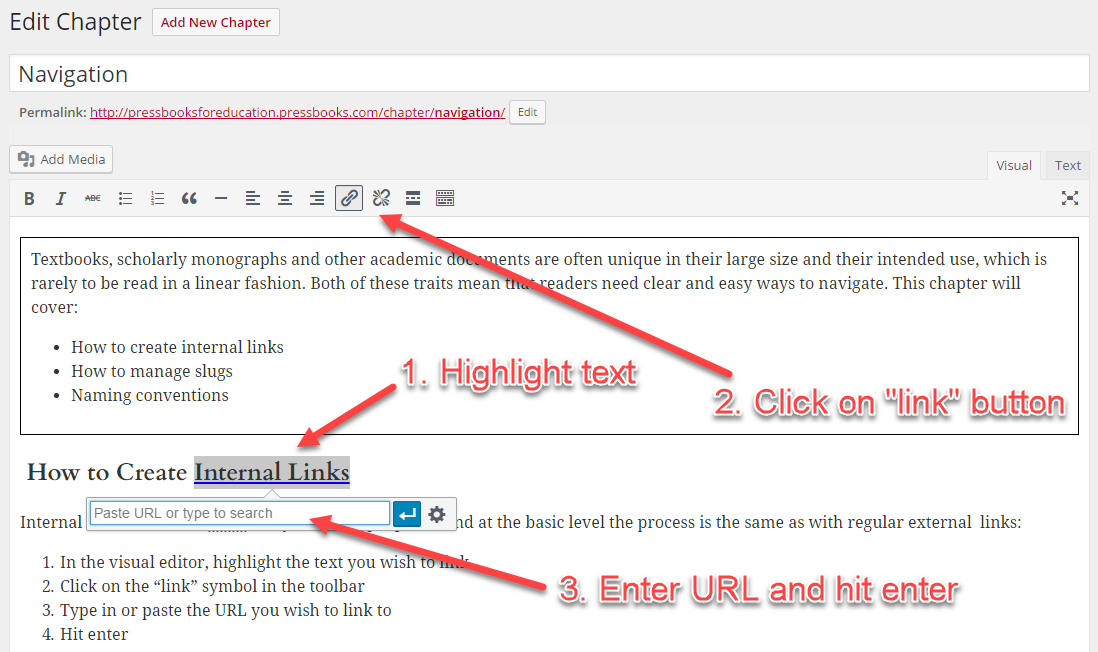
Internal links can be used for many different purposes, and at the basic level the process is the same as with regular external links:
- In the visual editor, highlight the text you wish to link
- Click on the “link” symbol in the toolbar
- Type in or paste the URL you wish to link to
- Hit enter
The difference when you are linking internally, rather than to a web page as you might be used to, is you don’t have a URL in the traditional sense. Instead, you need to use the identifier (called a slug, more on this below) of an internal location, of which there can be two kinds: default locations and locations that you create yourself. Both of these are used to indicate an exact point in your document.
Default Internal Links
When you create a document, there are already some identifiers that it will understand. For example, if you want to link to a chapter, you simply need to enter:
[book-title-here]/chapter/[your-chapter-title-here]
To link to a part, enter:
[book-title-here]/part/[your-part-title-here]
To link to a front matter section, enter:
[book-title-here]/front-matter/[your-section-title-here]
To link to a back matter section, enter:
[book-title-here]/back-matter/[your-section-title-here]
The easiest way to find the location identifier of the section-title is to look at the URL of a page in the web version of your book, and copy everything that comes after .com or .pub (including the forward slash).

Prefer to watch and learn? Watch this instructional video, created by our friends at BCcampus.
Create Custom Internal Links
In order to create links between more than just chapters or parts, you can create custom location tags that you can then link to from anywhere in your book.
Let’s say you’re writing a section of your book, and want to link to a list of terminology that you have written in an earlier chapter, named “Program Overview”.
- Go to the “Program Overview” chapter
- Find the “Terminology” section heading
- Place your cursor at the start of the heading and click on the “Anchor” button on the toolbar (it looks like a small flag, bottom row, fourth in from the left)
- Enter a name when prompted (this must be unique).
- You now have an anchor tag the start of your heading, and should see it appear as a small icon.
To link to it, go back to your chapter in progress, and follow the instructions above to create a link. When it prompts you to enter a URL, enter:
[book-title-here]/chapter/program-overview/#terminology
This indicates that the link is to go to a chapter named “Program Overview” and find the anchor tag called “terminology“.
Uses:
- Link to figures from main body text and vice versa, eg. See Figure 1 (NOTE: to add an anchor tag to an image caption, you must add it manually in the image editing window, not the visual editor. Simply enter the caption as <a id=”[your-id]”></a>[Your Caption]).
- Link to chapter sub-sections.
- Link to specific sections of back matter.
- Link between chapter sections and their related exercises.
Slugs
The identifiers we used above are commonly (or uncommonly, depending on your perspective) referred to as slugs. These are automatically generated for every section you create, and can be found by looking at your page URL as explained above. However, sometimes you might need to edit them. To do so:
- Go into the chapter or section whose slug you want to edit.
- Find the “Screen Options” tab in the top right corner of your screen.
- Check the “Slug” option.
- Click on “Screen Options” again to collapse the tab.
- Scroll down to below the visual/text editor to find the “Slug” section.
- Enter your new slug.
- Save or update your chapter.
This is a handy trick for a few reasons:
- If you have a long chapter name, shortening the slug can make it more manageable.
- If you start your title with a number (eg. “1. Program Overview”), your exports will add the word ‘chapter’ or ‘part’ to the front of the slug, which will break your links to that location. Use the slug editor to make sure your slugs start with a word, not a number.
- If you name both a part and a chapter the same thing, the exports will again add something to distinguish them from each other, breaking the links. Use the slug editor to make sure they’re different from each other.
Naming Conventions (and Analog Navigation)
Even if you aren’t planning on using internal links to navigate, it is important to remember a few things about large documents that can be accessed in several different formats.
For example, if we consider a textbook, one student could be reading the web version, another a copy they printed themselves, and another an ebook version with the font size increased because they have a visual impairment. In this situation, if all three readers are told to go to page 138, they will all arrive in very different places. With this in mind, a book that will exist in many formats needs to rely on other kinds of navigation systems.
We recommend avoiding page references altogether, and instead using a numbering system similar to the following:
1. Part Name
1.1 Chapter Title
1.1.1 Chapter Section
1.1.2 Second Chapter Section
1.2 Second Chapter Title
1.2.1 Chapter Section
Note: When using this system, be sure to enable the two-level table of contents in “Appearance –> Theme Options”. This will show both chapter titles and sections on the table of contents in all formats.
